|

|
Joint Design Considerations
1. Joint Gap: A small joint
gap enclosing a relatively small amount of brazing material
will have less serious voids due to shrinkage on solidification
than a joint with a large gap enclosing a larger volume.
Hence use the smallest clearance that will fill properly.
Joint clearance has a significant effect on mechanical
properties of the brazed joint, affecting static, fatigue
and impact performance. For butt joints between steel
using fine silver, brazed tensile strengths as high as
58Kg/mm2 have been observed whereas the tensile strength
of silver by itself is only 15Kg/mm2. In the case of lap
joints, tensile strength initially increases with joint
clearance, peaks at around 0.08 to 0.15mm clearance and
then decreases with increasing joint clearance. Shear
strength decreases steadily with increasing joint gap
from highest values at around 10 micron clearance.
RECOMMENDED JOINT GAPS
mm
|
Base Metal
|
Long Melting
Range Filler
|
Short Melting
Range Filler
|
|
Copper
|
0.05-0.25
|
0.05-0.15
|
|
Steel
|
0.04-0.15
|
0.04-0.15
|
2. Uniformity of Joint gap width (parallelism):
The rate of capillary flow is proportional to joint
gap width so that with joints having non-uniform widths,
the molten braze metal flows quickly through the wider
portions of the gap and can envelop unfilled areas resulting
in unfilled or flux filled cavities.
3. Inter-alloying and
flux type have an effect on optimum joint gap
- in the case of copper brazing of steel, there is very
little inter-alloying, copper wets steel very well and
the oxides formed are not refractory so that and even
interference fits can produce sound joints.
4. Surface Finish:
The recommended surface finish for joint faces is 0.7-2
microns Ra. Greater than 6 micron roughness can result
in reduced joint strength as only the high points might
braze, the amount of filler metal required also increases
at larger values of roughness.
5. Entrapped flux:
Flux pockets in the final joint can significantly reduce
the mechanical properties of the joint. Oxide-saturated
flux has higher viscosity and is less easily displaced
by advancing molten braze metal. It is important to
have initially clean joint faces, a reasonably short
brazing time and sufficient flux to avoid excessive
flux “loading” which increases its viscosity.
Also, a brazing alloy that wets and flows well on the
material is more effective in displacing flux and avoiding
flux entrapment.
6. Gas cavities:
Bubbles of gas formed due to chemical action between
the metals being joined, too active a flux, unclean
surfaces or unduly reducing flame in gas torch brazing
are causes of gas porosity and cavities. The expected
soundness of brazed joints produced under production
conditions is unlikely to better than 85% in practice,
but joints with less than 70% soundness can be improved.
Silver brazing alloys will not usually flow through
a capillary gap to a length of more than about 20mm
for single point application of brazing alloy, longer
overlap joint lengths can be achieved using brazing
alloy ring preforms.
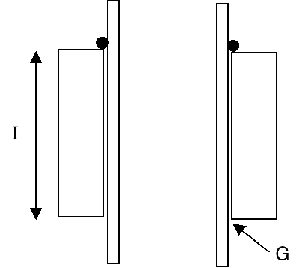
A realistic rule-of-thumb for lap joints and tube-to-tube
brazing is: "joint overlap length should normally
be between 3 and 4 times thickness of the thinner component;
it should not be less than 3 mm nor more than 20 mm
for single point application of brazing alloy."
For tube-in-tube or plug-in-tube type of brazed assemblies
involving different metals, it is highly recommended
that the outer member should have the higher coefficient
of thermal expansion which will result in the braze
metal being in a state of compression after cooling
down. The reverse will result in the joint being in
a residual state of tension, impairing strength behaviour,
especially under dynamic loading.
Braze Metal Calculations
The optimum volume of brazing alloy required in a joint
is 25% more than the volume of the joint gap at the
brazing temperature.
Preform ring wire diameter calculation

 ,
where D=Ring wire diameter. ,
where D=Ring wire diameter.
The value of joint gap G to be used in this calculation
is the dimension at the brazing temperature, taking
into consideration thermal expansion.
Mechanical Properties:
The strength of the brazed joint
is not directly related to the method of filler metal
melting. Joint strength is dependant on joint design,
metal cleanliness, brazing temperature, amount of brazing
filler metal applied, location and method of application,
heating rate and many other factors making up the brazing
technique.
Therefore a classification method based on mechanical
properties would be misleading since it would only apply
if the brazing filler metal were used on a given base
metal with a specific joint design. If a user desires
to determine the mechanical properties of a given base
metal/filler metal combination, tests should be conducted
using defined configurations and procedures eg AWS SC3.2
"Standard Method for Evaluating the Strength of
Brazed Joints".
For more information, refer to the Brazing Handbook
by the American Welding Society.
|
|
|
|
|
|


